Instruction covers RWD and AWD Q50's.
The following instructions are a walk through for installing SS brake lines on an Infiniti Q50 with sport brakes.
Special Thanks goes out to Mike at www.TunerzStore.com for his support of the project!
|
Parts Supplied By:
 |
|
Tools needed:Car jack and jack stands (or lift), impact gun (preferred), 10/12/14mm wrenches (ratchet with 12mm and 14mm sockets optional), 10mm brake line wrench, pliers, brake fluid (Genuine NISSAN Super Heavy Duty Brake Fluid or equivalent DOT 3), brake cleaner, catch bucket. Optional: power bleeder
|
|
|
SS line installation is pretty straight forward. Swapping the lines themselves are not difficult nor time consuming; bleeding the system afterward takes the most amount of time. 2 people are needed for the bleeding process if you do not utilized a power bleeder. |
|
Click for larger |
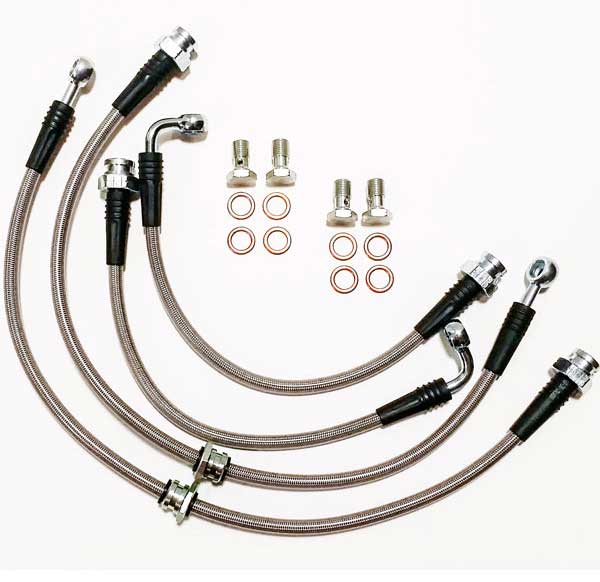
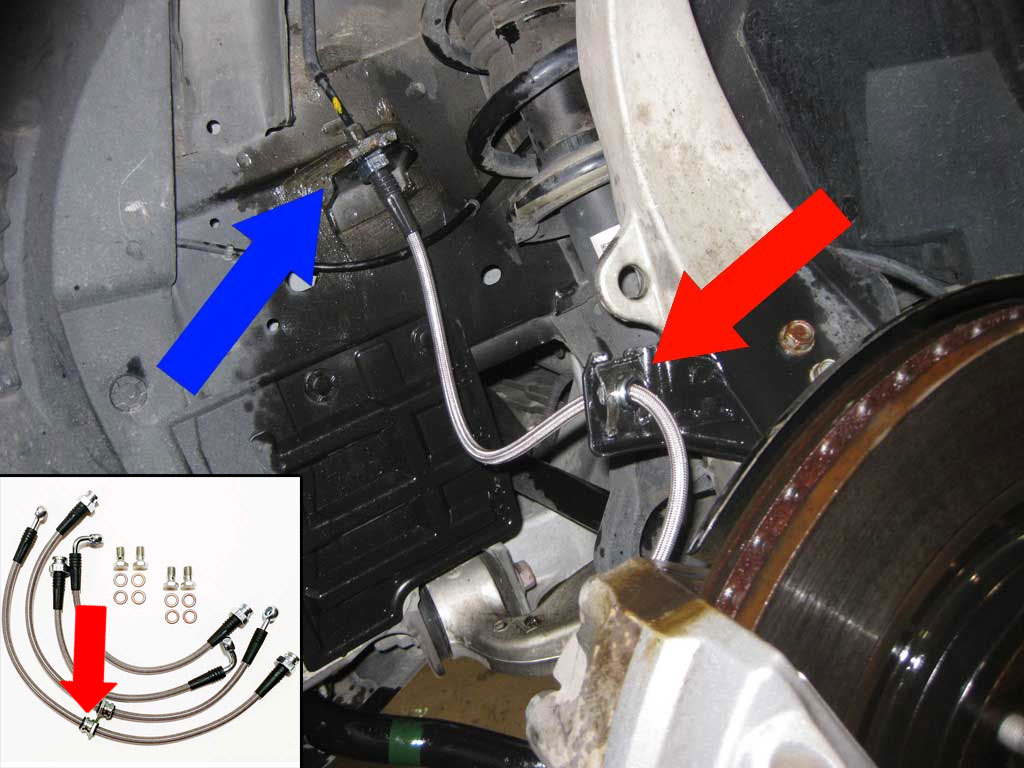
Parts. Factory brake lines in the rear are 2-piece units in which the line transitions from the metal line to rubber, then to a metal block which is attached to the caliper via a bracket, then to a metal line from the block to the caliper. The Tunerzstore kit simplifies this design by utilizing a single brake line, thus, the bracket is completely removed.
|
|
Click for larger |
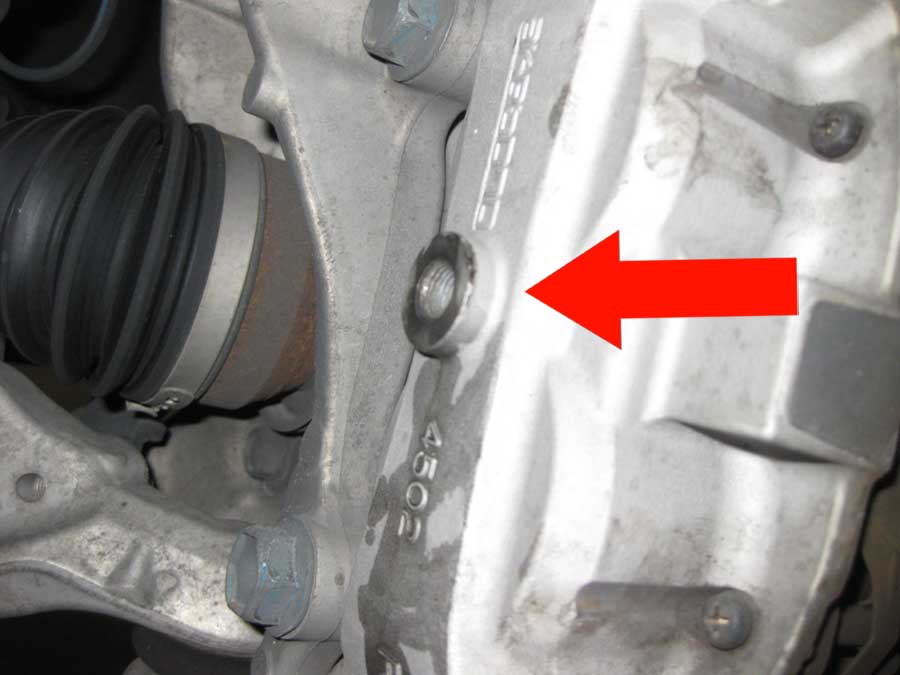
Step 1. Put the catch bucket under the section you are working. Use a 10mm wrench to remove the factory brake line from the back of the front caliper as shown. Brake fluid will drain into the bucket.
|
|
Click for larger |
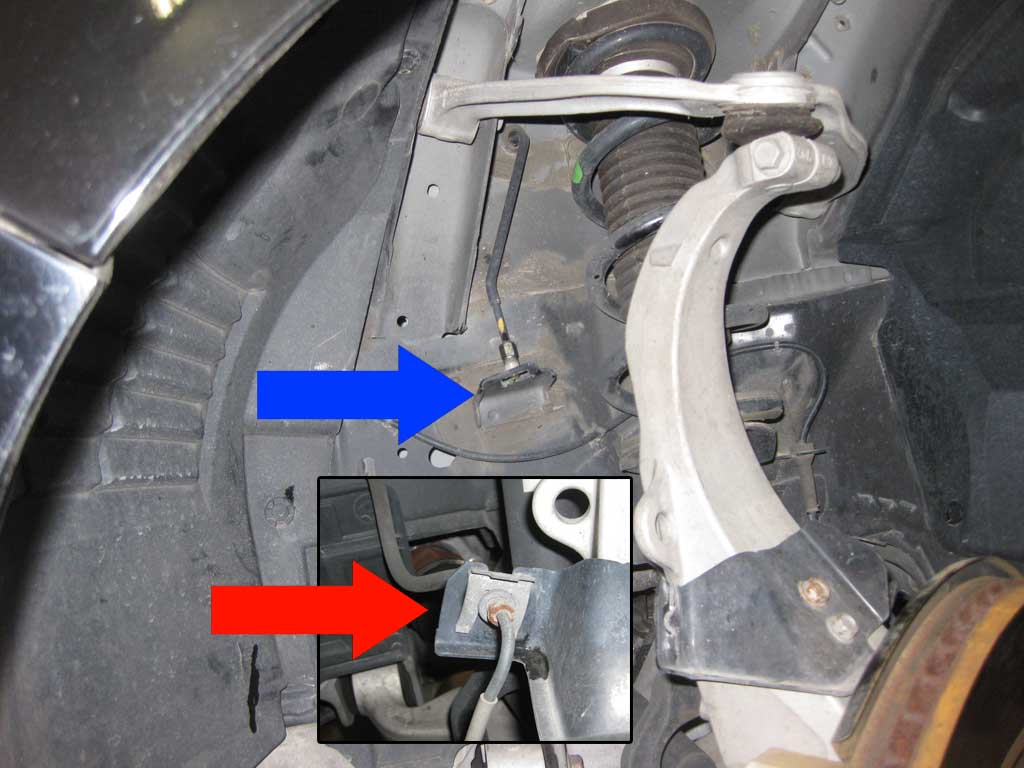
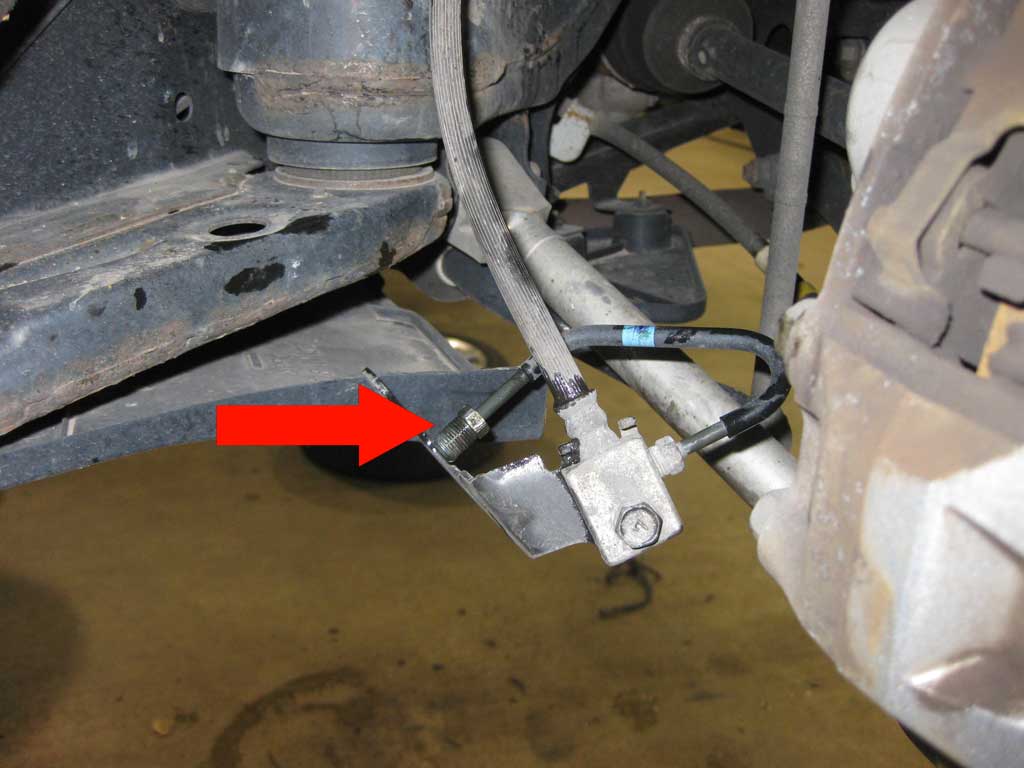
Step 2. Use pliers to remove the front clip as shown via the red arrow and remove the line from the mount. Use pliers and the 10mm line wrench (or similar) to remove the top metal line from the bracket. Remove brake line and set aside. Before installing the front line take this time to use brake cleaner to clean this bracket off to avoid getting dirt in the new lines.
|
|
Click for larger |
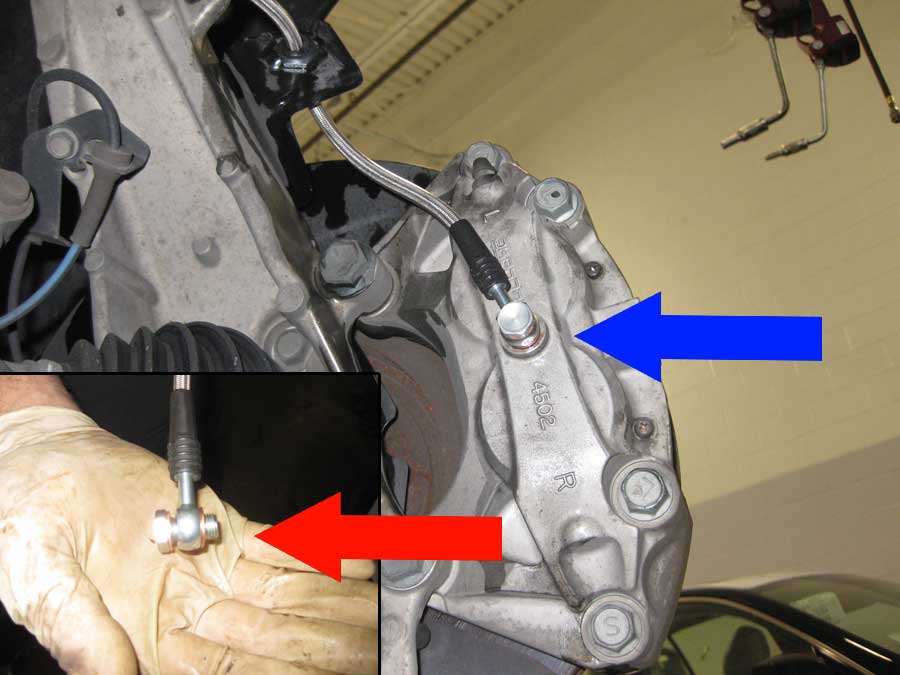
Step 3. Install the brake line in the following order:
- Image 1: Install new banjo bolt onto brake line fitting with copper washers as shown (red arrow) and utilize a 14mm wrench to attach the new banjo to back of caliper (blue arrow), torque between 12 to 14 ft/lbs
- Image 2: Clip the new brake line to the top mount and connect the metal brake line to the new SS line with the 10mm line wrench and pliers (blue arrow); Reinstall front mounting clip (red arrow)
NOTE: The mid-line metal sleeve on the SS line, marked in the lower image via the red arrow, allows the SS line to be adjusted if you choose to do so (should not need it). Add some lubricant to the SS line at the sleeve and you can slide it up or down the SS line for proper alignment to allow for line flexibility as needed. Do not pull aggressively, slowly start to twist/move the sleeve after lubricating.
|
|
Click for larger |
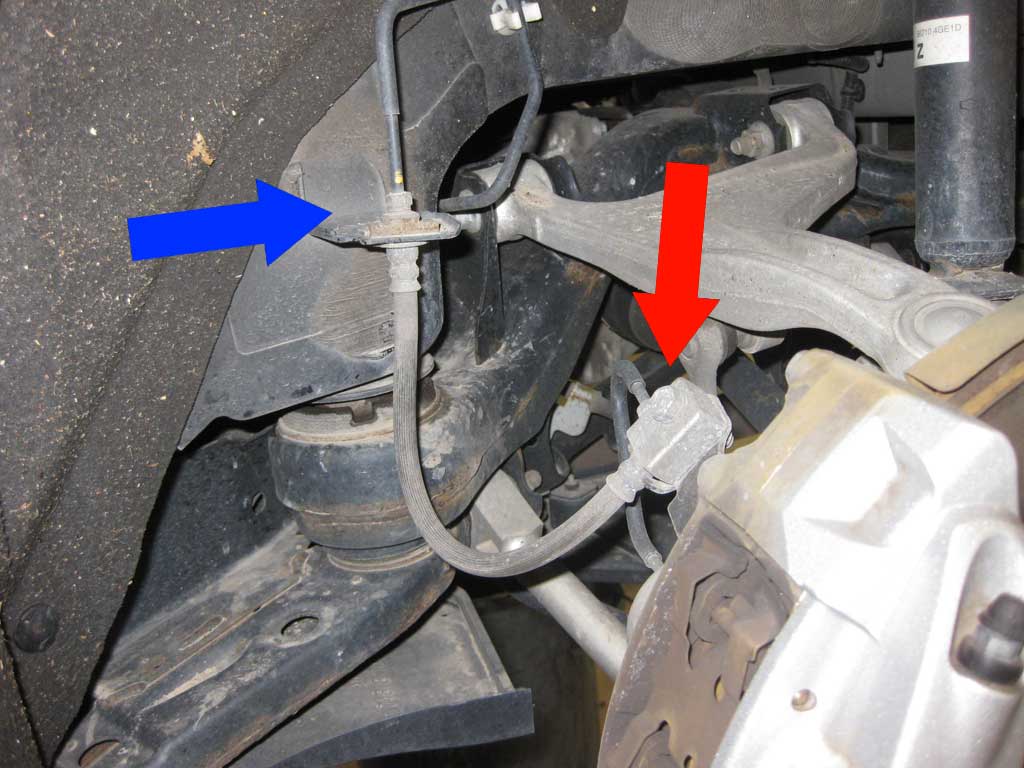
Step 4. Put the catch bucket under the section you are working. Remove the rear line in the following order:
- Image 1: Use a 10mm wrench to remove the brake line from the back of the caliper and use a 12mm wrench to remove the bracket bolts that hold the metal block in place.
- Image 2: Using pliers and a 10mm line wrench disconnect the metal line from the rubber brake line (blue arrow). Use pliers to remove the clip holding the rubber line to the bracket and remove the brake line. Before installing the rear line take this time to use brake cleaner to clean this bracket off to avoid getting dirt in the new lines.
In case you are installing factory-style brake lines which use the block the removal and installation would be a tad different as you would remove the 12mm bolt which holds the block to the bracket and disconnect the metal line on the caliper from the block. Reinstall in reverse order.
|
|
Click for larger |
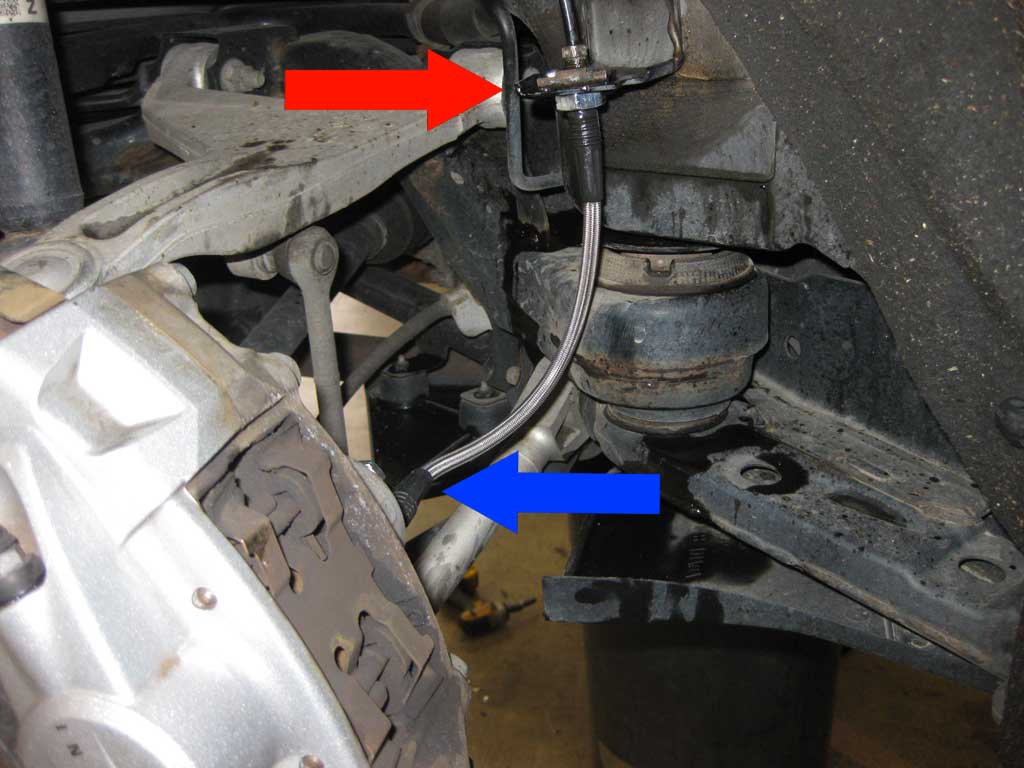
Step 5. Install the rear brake line in the following order:
- Image 1: Install new banjo bolt onto brake line fitting with copper washers as shown in the above front step and utilize a 14mm wrench to attach the new banjo to back of caliper (red arrow), torque between 12 to 14 ft/lbs
- Image 2: Clip the new brake line to the top mount and connect the metal brake line to the new SS line with the 10mm line wrench and pliers (red arrow)
|
|
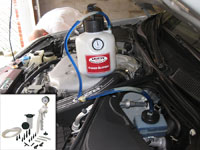 |
Step 6: Bleeding Brakes. There are multiple ways to bleed the brakes and plenty of shade tree mechanic methods to make life easy. We were able to use two kits to make life MUCH easier: Brake power bleeder and a Brake Vacuum Pump kit. In effect, the power bleeder, which attaches to the vehicles brake fluid reservoir, contains spare brake fluid and is under pressure, 15psi in this case, to allow fluid to be pushed towards all four calipers during the bleeding process. The brake vacuum pump kit allows each caliper to be bled and uses pressure to help draw fluid out of the caliper and into an attached reservoir cup which makes bleeding easy and clean (keeping the kit under pressure helps ensure there is no fluid spills. There is no need to have someone constantly pump/hold brakes to bleed the calipers with this configuration.
Unlike single piston brakes the Akebono brakes have to be bled from both the front and back of each caliper as each side provides even pressure during braking. When bleeding the brakes we performed 3 complete passes of the calipers to ensure they were completely bled. Always start with the caliper furthest from the Master Cylinder and work your way to the closest in this order: Rear passenger, Rear drivers, Front passenger, Front drivers.
When brakes have been drained use brake cleaner liberally on brake rotors and any other parts or areas that have brake fluid residue.
|
Disclaimer: The author will not be held responsible nor held liable for any damages due to these instructions. Anyone following these directions are doing so at their own risk. This Documentation may not be distributed without the authors consent.
|


